
Hints & Tips For Laying Stone Tiles
- Natural stone tiles are all slightly different and it is perfectly normal to find a variance of colours, markings, thickness and textures. This is a natural feature of these types of material and means that every room is unique.
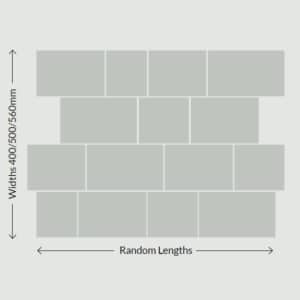
- Due to the nature of the manufacturing process, in some of cases there can be a very slight ‘bow’ along the length of the larger tiles (600mm or bigger). If you are considering laying your floor tiles in an off-set brick pattern it is best to stagger the tile by only a third or less rather than staggering by half a tile. This will minimise the effect of the bowing on the finished look.
- It is important to consider a balanced design and allows for manageable cuts. For example, if you are tiling a complete wall, allow for a similar size cut of tile in each corner as well as considering features such as windows – these should be centred in the design.
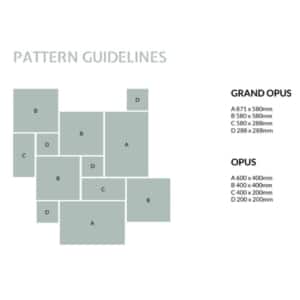
- The layout of your tiles will affect the finished look enormously so it is worth some thought ahead of buying your tiles. You can stagger joins, or set tiles diagonally for a diamond-effect pattern, or use inlay designs for a strong pattern. Which ever you choose, tiles are laid in the same way: just add the start position accordingly.
- Do not plan to leave small slivers at corners as they are difficult to cut. The closer the cut is to a half tile, the easier it is to make.
- If you are starting at ground level, you cannot guarantee the floor is level. Attach a level batten and work from this to achieve a balanced design. When tiling off a bath or shower tray rim, check first that the edges are level, but these are normally suitable potential starting points for tile rows.
- When you measure the dimensions of a design, remember to allow for grout gaps. For wall tiling, these are normally 2-3mm and floor tiles normally have grout gaps of 5-20mm depending on the stone choice.
- Plastered wall surfaces will support tile weights up to around 20kg/sq.m. Therefore, rendered or cement board wall surfaces, which support tile weights of around 40kg/ sq.m, are more suitable for large (heavy) format tiles. Adhesive weight must also be included in your square metre calculations.
- All images on our website and in any brochures should only be used as an approximate guide in terms of finished appearance.
- Viewing actual samples or products in-situ is highly recommended prior to order placement. Sample tiles can be arranged on request.
- All tiles should be graded upon receipt to ensure they blend harmoniously within the overall design scheme adopted.
- They should also be graded in terms of size and thickness, as all dimensions listed are nominal and small variations can occur. The thickest tiles should be installed first to establish the required finish floor level, thereby allowing thinner tiles to be bedded up with adhesive.
- Please note that some products may arrive damp, which often changes the appearance of the stone by making tiles look darker.
- It is essential that tiles are completely dry prior to installation so that any colour variations can be assessed.
- A 10% allowance for wastage that can occur in transportation, site handling and cutting should be made at the time of order.
- Materials should be inspected and unpacked carefully, then cleaned prior to fixing as they may feature a residue from the production process.
- All natural stone tiles are to some extent porous and sealing them with an appropriate product is highly recommended in order to make the maintenance and routine cleaning much easier. Please consult sealant Manufacturer for advise.
This guide is provided to you by Riley James Kitchens, Bathrooms & Bedrooms, along with Strata stones.
Riley James, providing bespoke kitchens to Gloucestershire.
 |
 |